From the Document Items tab, you can add items to, edit items on, or delete items from your quote. See Working with Document Items for more information.
Customizing Columns
You can customize the columns of the Quote Workbook’s Document Items tab, as well. You can change which columns are displayed, the title of each column, and in which order the columns appear under View > Customize Columns. For details, see Customizing QuoteWerks.
See Setting the Shipping Amount.
Show/Hide Etilize Panel
The show/hide Etilize Panel icon will open the Etilize panel on the Document Items tab and let users update, change, and select information from Etilize. This allows users to use the Etilize integration on the DocumentItems Tab for any items that have the manufacturer part number and manufacturer included for items on the tab.

When this icon is selected, the Etilize panel will display below the line items on the DocumentItems tab to allow for any changes or updates.
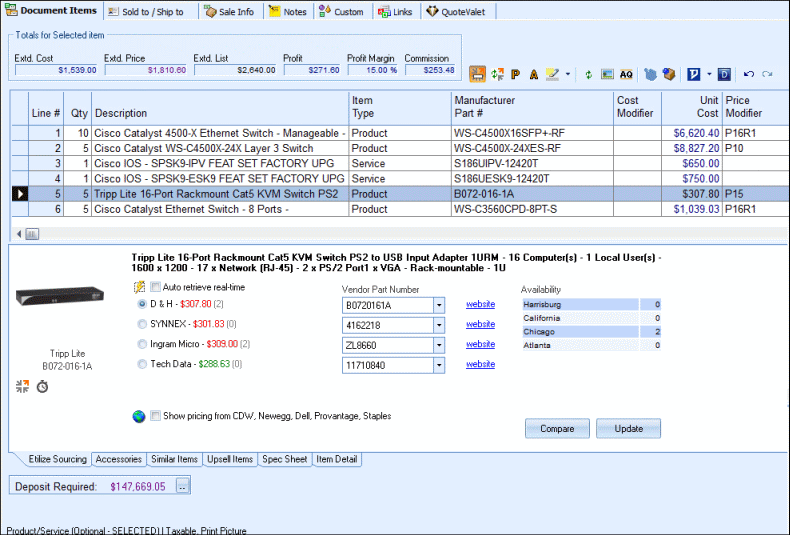
For more information on using the Etilize integration, see our Using the Product Content Subscription topic.
Refresh Item(s) with Etilize Details
The Refresh Item Item with Etilize Details icon will update any selected items on the DocumentItems tab with information from Etilize including pictures, weight, descriptions, and more. This is a useful feature if items have been imported from the Paste Special tool or manually added to a quote and the user would like to retrieve the Etilize product content for those items. For information on how to use Etilize, visit the Using the Product Content Subscription topic.
Refresh Item Details
For information on refreshing item details with data from your product sources, please see the Refresh Item Details topic.
The P icon directly above the line-items list under the Document Items tab displays unit-price properties for a selected item — the same window that appears under the Edit -> Edit Product/Service properties... menu.

The P icon allows you to adjust the unit price formula of a product or service without having to right-click, or click the Edit menu.
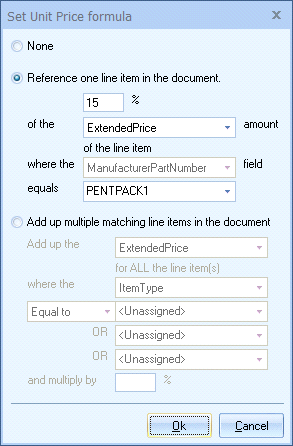
See Formula-based Unit Pricing for more details on the Set Unit Price Formula window.
For more information on the windows that appear based on their line types, see: |
Edit Line Attributes
The A icon directly above the line-items list under the Document Items tab displays the Line Attributes window — the same window that appears under the Edit -> Edit Line Attributes... menu, or when you double-click the row selector for a line item in your quote (![]() , to the far left of the line item).
, to the far left of the line item).

The A icon allows you to edit the attributes of a specific line item without having to right-click, or click the Edit menu.
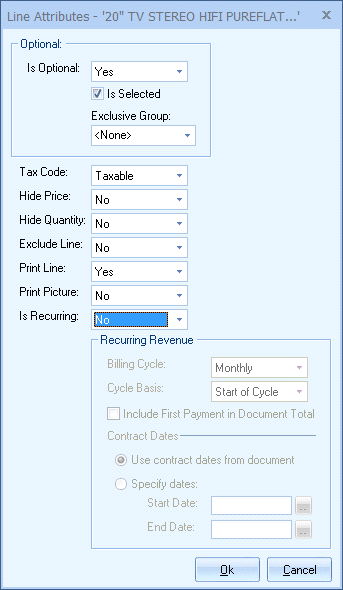
See Line Attributes for more details on the Line Attributes window.
The Highlight Line Items icon will highlight single or multiple selected lines on the DocumentItems tab. Users can choose from five different colors of Yellow, Orange, Red, Green, and Purple. This provides the ability to tag/highlight line items to use as a visual aid such as a line that needs attention, correction, or improvement. This feature can also be used in conjunction with the Notes column to enter notes about what changes need to be addressed. The highlights will only appear on the DocumentItems tab, they will not print on the PDF or be viewable in QuoteValet.
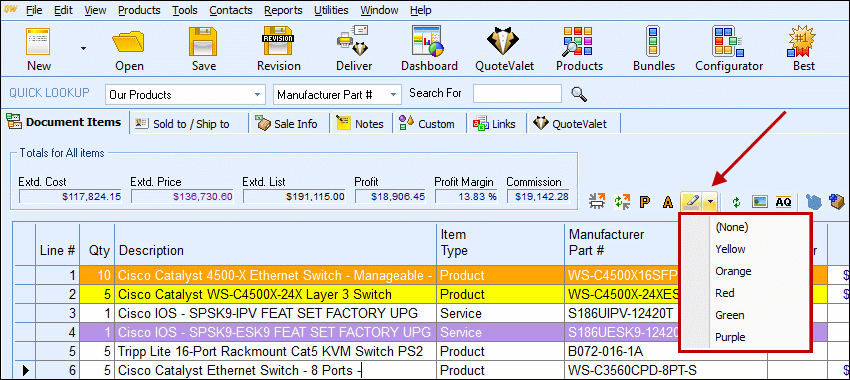
While a line or multiple lines are highlighted and selected on the DocumentItems tab, clicking on the highlight icon ![]() will toggle the color to yellow, and then if pressed again will turn the highlighting off for those items.
will toggle the color to yellow, and then if pressed again will turn the highlighting off for those items.
Selecting Pictures/Videos for Items Manually
If a picture and/or video has not been added on the for an item through the edit product menu, you can manually associate a picture and/or video with a line item in the quote. There is a "Show/Hide Set Picture/Video Panel" button ![]() on the Document Items of the Quote WorkBook. This button is located next to the Totals for Selected items window in QuoteWerks on the Document Items tab. To enable this feature, highlight an item in the quote and click on the
on the Document Items of the Quote WorkBook. This button is located next to the Totals for Selected items window in QuoteWerks on the Document Items tab. To enable this feature, highlight an item in the quote and click on the ![]() button in QuoteWerks. You can manually specify a picture and/or video for line types of Products/Services, Group Header, Heading, Comments, Summary, Subtotal, Running Subtotal, Percent Charge, and Percent Discount lines.
button in QuoteWerks. You can manually specify a picture and/or video for line types of Products/Services, Group Header, Heading, Comments, Summary, Subtotal, Running Subtotal, Percent Charge, and Percent Discount lines.

This will display a new panel making it easy to see the current picture and associate a picture with the item. You can also drag a picture file onto the [Select Picture] button.

For more information on setting up a video for a line item in QuoteValet, visit the Setting Line Item Videos topic.
There are two ways to request the latest shipping rates from carriers and bring them into QuoteWerks.
Important: You must have an account with FedEx and/or UPS to do this. See Shipping Rates in QuoteWerks for information on how to set up this feature. |
First, you can add a new line item to the quote. To do this, click the shipping icon (![]() ) directly above the line-items list under the Document Items tab, or select the Tools -> Shipping Estimator menu.
) directly above the line-items list under the Document Items tab, or select the Tools -> Shipping Estimator menu.
Your second option is to calculate a shipping amount for the entire document instead of a single line item. To do this, click ![]() next to the Shipping display at the bottom of the Quote Workbook.
next to the Shipping display at the bottom of the Quote Workbook.
The Shipping Amount window will appear, enabling you to add shipping manually, add up the charges per line item or based on weight, or use the FedEx/Ups real-time rate quote.
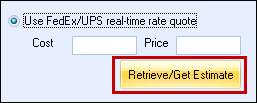
To use FedEx/UPS, simply select the corresponding radio button and click the [Retrieve/Get Estimate] button.
The Add shipping rate item (Get shipping rate, if you’re calculating the entire document) window will appear, where you can start filling in the appropriate data to retrieve the shipping charge from your carrier(s).
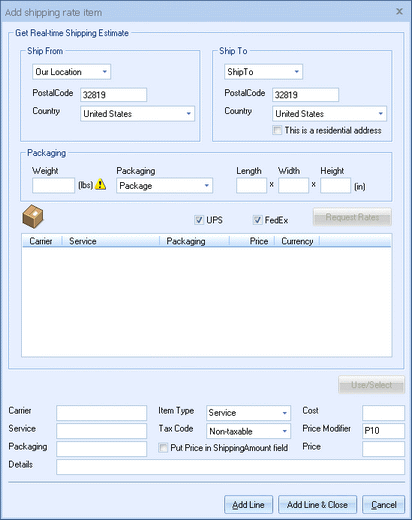
Important: Any field with a |
The Ship From fields pull the zip code from the Our Location fields in QuoteWerks, which you can set under the Tools -> Options menu > Company tab. The Ship To fields pull from the zip code from the Ship to fields under the Sold to / Ship to tab in the Quote Workbook. You can choose to use the zip code from the Sold to, Ship to, or Bill to fields, or enter a zip code manually. Additionally, F2 Lookup support is enabled for the postal code field under the "Ship From" section. This is useful to create a list of zip codes commonly shipped from to better calculate pricing.
The Packaging section of the window allows you to choose what type of parcel you’re shipping.

Choose "Box," "Envelope," "Package," "Pak," or "Tube" from the Packaging drop-down box. You can also add package dimensions, if applicable.
Once you select and fill out your options, choose which carrier(s) you’d like to request rates from (UPS and/or FedEx) under the fields you selected/filled out. Then, click on the [Request Rates] button to search all the rates for each carrier and service.
The results will return, each listing the carrier, type of service, packaging, and pricing information (including currency).
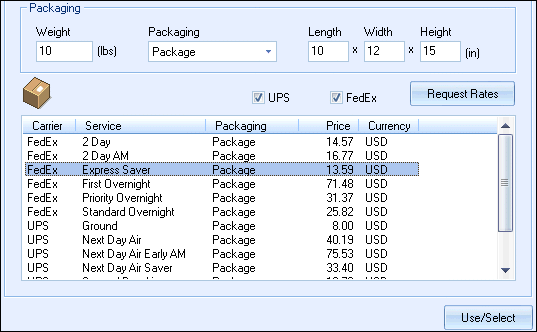
Click on the service you’d like to use, then click on the [Use/Select] button.
Once you’ve selected a service, the corresponding information will populate at the bottom of the window. This will include the Carrier, Service, Packaging, and Details (weight, size, etc). This information is auto-filled, and can’t be adjusted without selecting a different service. You can then select a shipping Item Type and Tax Code.

By default, a line-item shipping rate will populate the Unit Price column under the Document Items tab of the Quote Workbook. To insert the shipping rate into the Document Items tab’s Shipping Cost column instead, select Put Price in ShippingAmount field.
Clicking the appropriate button at the bottom of the window to add your shipping rate to the quote. Add Line is a good idea if you plan to add multiple shipping line items (to allow your customer to choose which shipping method they prefer), while Add Line & Close will add the single line and return you to the Quote Workbook.
After you add the shipping rate to the quote, you can simply select the line item and click the ![]() icon above the line-items list to make any necessary changes. This will launch the Edit shipping rate item window, where you can make any adjustments without having to start from scratch.
icon above the line-items list to make any necessary changes. This will launch the Edit shipping rate item window, where you can make any adjustments without having to start from scratch.
![]()
The Active Quotes Panel will display any active quotes for a contact selected on the Sold to / Ship to Tab. The ![]() icon on the grid toolbar on the Document Items tab will toggle this panel on and off. Users will also be able to close out of the panel by clicking on the 'X' of the panel. Any documents that are still active (not converted to closed, won, lost, etc) will be listed in this panel. If a listed quote is a revision of the original, an [R] indicator will appear after the document number.
icon on the grid toolbar on the Document Items tab will toggle this panel on and off. Users will also be able to close out of the panel by clicking on the 'X' of the panel. Any documents that are still active (not converted to closed, won, lost, etc) will be listed in this panel. If a listed quote is a revision of the original, an [R] indicator will appear after the document number.
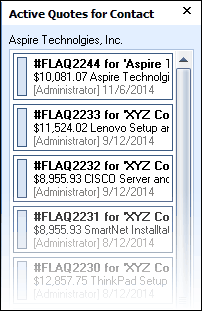
Users are able to access these documents by right-clicking on them to open them in QuoteWerks. Furthermore, if the document is old and can be converted to lost, users can right-click to convert the document to lost without having to open it first.

Clicking ![]() above the line-items list will undo the previous action.
above the line-items list will undo the previous action.
You can use this undo feature up to 10 levels. The keyboard shortcut [CTRL+Z] will also apply this feature. Clicking ![]() will redo the previous action. This allows you to quickly reapply a change that may have been undone by mistake. The keyboard shortcut [CTRL+Y] will also apply this feature.
will redo the previous action. This allows you to quickly reapply a change that may have been undone by mistake. The keyboard shortcut [CTRL+Y] will also apply this feature.
Totals for Selected Items Display
Located above the list of line items on the Document Items tab is the Totals Bar:

When you select line item(s), this Totals Bar will display the Extd.Cost, Extd. Price, Extd. List, Profit amount, gross Profit Margin, and Commission amount only for the lines selected. If no line items are selected, these values will reflect the total of all items on the quote. If the Profit amount/Profit Margin are negative, they'll be displayed in red.
There are also several access-right settings that control which of these displays are visible. Using the QuoteWerks security features, you can individually hide the Profit, Profit Margin, Extd. Cost, and Commission values. To do this, click the Utilities -> User Maintenance menu, select a user from the list, click Edit, and select the appropriate CannotSeeSelTotals option(s) for the user under the Access tab.
|
Alternate Currency Totals Display
If you’ve selected an alternate currency for this quote under the Quote Workbook’s Sale Info tab, you’ll see a push button for the selected alternate currency in the Totals Bar:

When you click this button, the totals will be displayed in the alternate currency rather than the base currency.
Totals Display / Deposit Required
Located below the list of line items on the Document Items tab are the Totals Display and Deposit Required function.
USA Formatted Totals Display

For USA customers, the totals for all the line items in the document will be displayed for Subtotal, sales Tax, Shipping amount, Total, and the Recurring amount, if any, which is set under line attributes. See Line Attributes for more information.
Canadian Formatted Totals Display

For Canadian customers, the totals for all the line items in the document will be displayed for SubTotal, GST Tax, PST Tax, Shipping amount, Total, and the Recurring amount, if any, which is set under line attributes. See Line Attributes for more information.
If you require a deposit from your customer, you can set an amount by clicking ![]() next to the Deposit Required display at the bottom of the Quote Workbook. This will bring up the Deposit Required window, allowing you to set the deposit for this quote.
next to the Deposit Required display at the bottom of the Quote Workbook. This will bring up the Deposit Required window, allowing you to set the deposit for this quote.
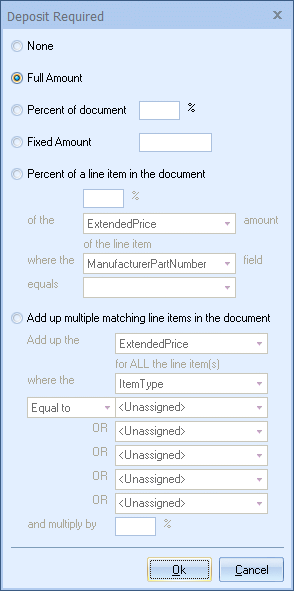
The Deposit Amount for each document will use this default setting. The deposit amount can be set to None, the Full Amount of the document, a Percentage of [the] document total, a Fixed Amount, or based on a line-item amount (like a subtotal or percent of a line item’s extended price). Typing an amount into the Percentage of document field will auto-populate the Fixed Amount field with the actual amount related to the percent you entered. You can still change the Fixed Amount field manually, for rounding purposes or otherwise.
You can also select Percent of a line item in the document which will calculate the deposit based on that single line item. Additionally, by using the Add up multiple matching line items in the document option, you can choose to add up multiple line items where the item type, manufacturer, manufacturer part number, vendor, vendor part number, and custom text fields match the criteria specified. You can add up items that are "Equal to", "Not Equal to", "Contains", or "Begins with". This enables you to set the deposit for only a certain amount of line items. So if the quote contains a few items that require a deposit but others that don’t, you can easily calculate the deposit automatically using this summary filter.
The Deposit Required feature can be used in conjunction with QuoteValet, requiring a customer to put down a deposit when they accept the quote. For more information on payments through QuoteValet and accepting deposits, see QuoteValet.
Note: You can set a default Deposit Required under the Tools -> Options menu > Documents tab. |
Importing Tech Data Quotations
In addition to Paste Special, there are two other ways to import a Tech Data quote into QuoteWerks. The first is by importing an Excel-formatted quote, and the other is to import the SAP quote from Tech Data’s internal system. However, in order to use these features the Tech Data XML credentials need to have been added to the installation.
Importing Tech Data Excel Quotations
If you’ve purchased the QuoteWerks Real-time Module and have entered your Tech Data USA or Canada real-time credentials, a Tech Data icon (![]() ) will appear above the items list:
) will appear above the items list:

To import a Tech Data Excel quote:
Step 1: Click the ![]() icon, or the arrow next to the icon then Import Tech Data Excel Quote:
icon, or the arrow next to the icon then Import Tech Data Excel Quote:

Step 2: Browse for and select the Tech Data Excel file you’d like to import into QuoteWerks.
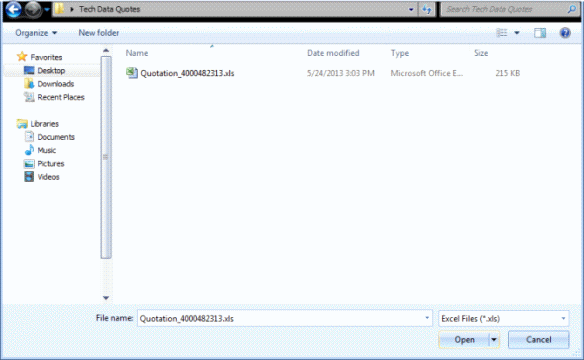
Step 3: Click on the [Open] button, and the Tech Data Excel document will be imported into QuoteWerks. If you select a line item in the quote before importing the Excel file, the Tech Data price quote will be inserted above the selected line. If no line is selected, the Tech Data quote will be imported at the end of the QuoteWerks quote.
The Tech Data quotation number, shipping amount, and freight amount are inserted as a non-printing comment line, for your reference. If any promo notes for the imported items are in the Excel sheet, they’ll appear in the Notes column for each line item. After the Tech Data Excel Price quote file is imported, it will be linked automatically under the Links tab for future reference.
Importing Tech Data SAP Quotations
You can also import a live quote from Tech Data’s SAP system into QuoteWerks. This feature is only available for Tech Data USA SAP quotes.
To do so, click the arrow next to the ![]() icon, then click Retrieve Tech Data SAP Quote.
icon, then click Retrieve Tech Data SAP Quote.

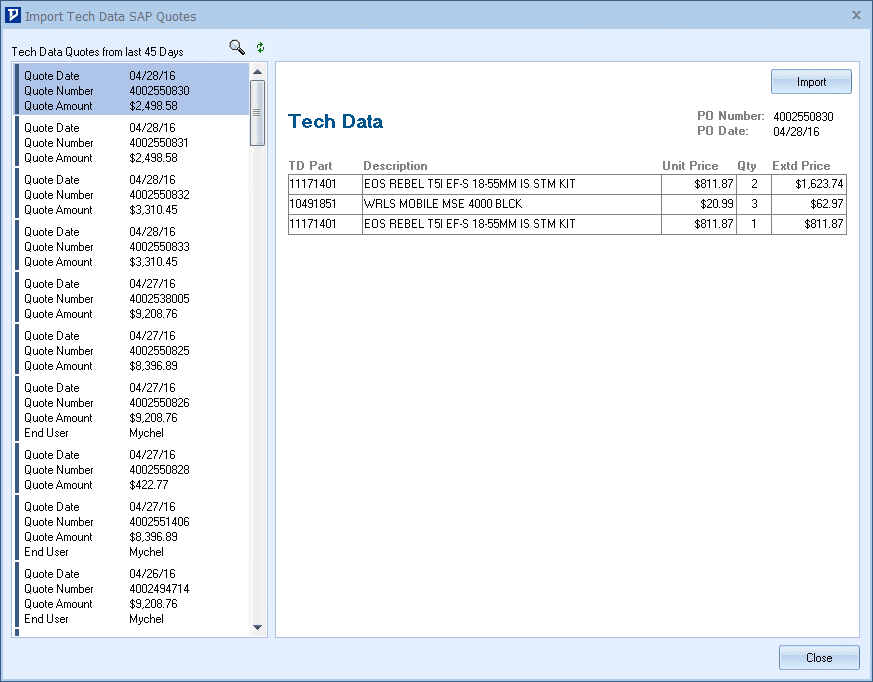
The resulting window will display all of the Tech Data quotes from the last 45 days. Highlight a quote to see the items that comprise that quote or click on the magnifying glass to search by the quote number.
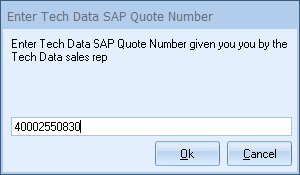
Once you have located your SAP quote, simply click on the [Import] button to import that quote into QuoteWerks. The line items will be added to the current open document in QuoteWerks.
Note: This feature only includes SAP quotes and does not support Tech Data StreamOne quotes for importing. |
Related Topics: