The salesforce.com integration has a unique feature that enables the salesforce.com user to click on a hyperlink located on a salesforce.com opportunity window which will start QuoteWerks and copy all the account and opportunity information into a new quote to automate the creation of a new quote using the details from the salesforce.com window.
Setup
Before you can initiate the creation of a new quote by clicking on a hyperlink on the opportunity tab in salesforce.com, you will need to setup the hyperlink. This web integration link will launch QuoteWerks and pass it the necessary information from your opportunity.
Step 1: From within salesforce.com go to Setup.
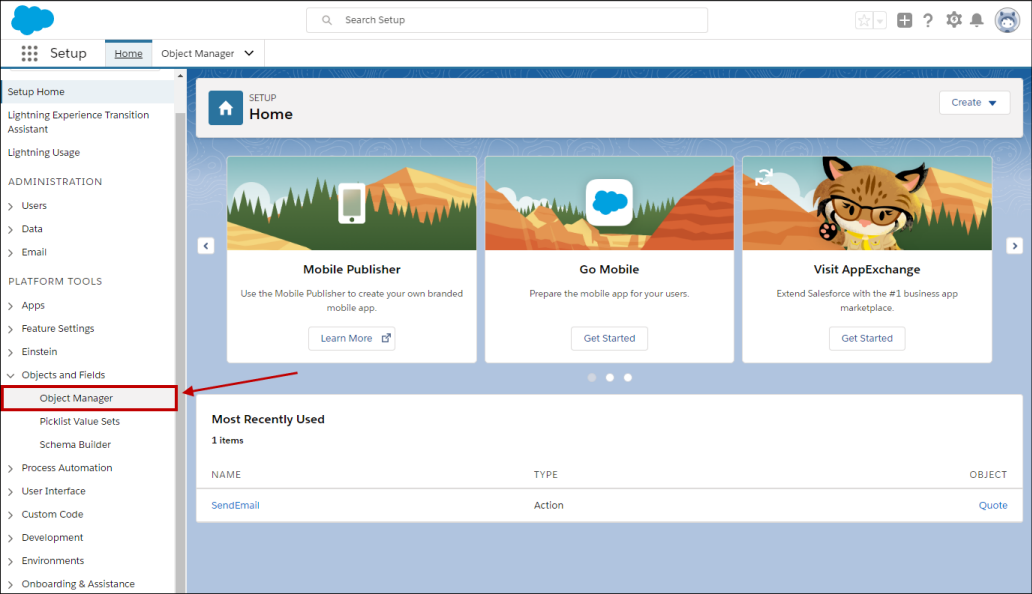
Step 2: Click on the “Objects and Fields” link and then the "Object Manager" link:
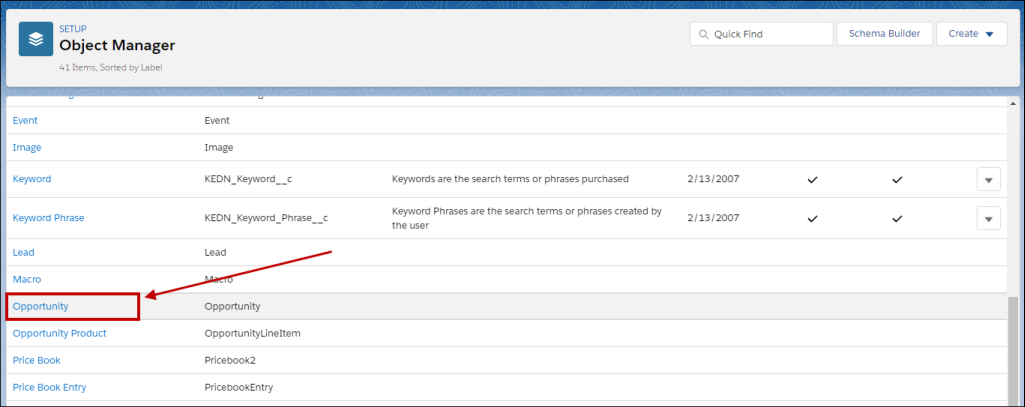
Step 3: Click on the “Opportunity” link:
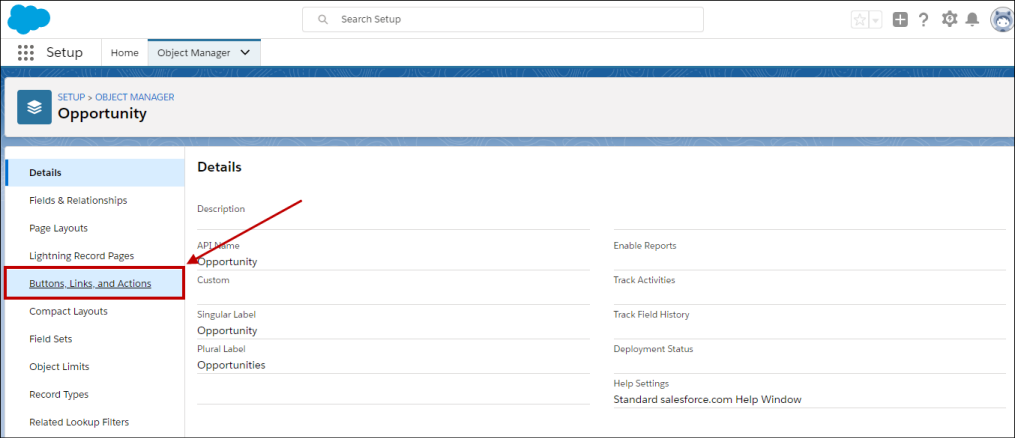
Step 4: Click on the “Button, Links, and Actions” link to create a new Web integration link:
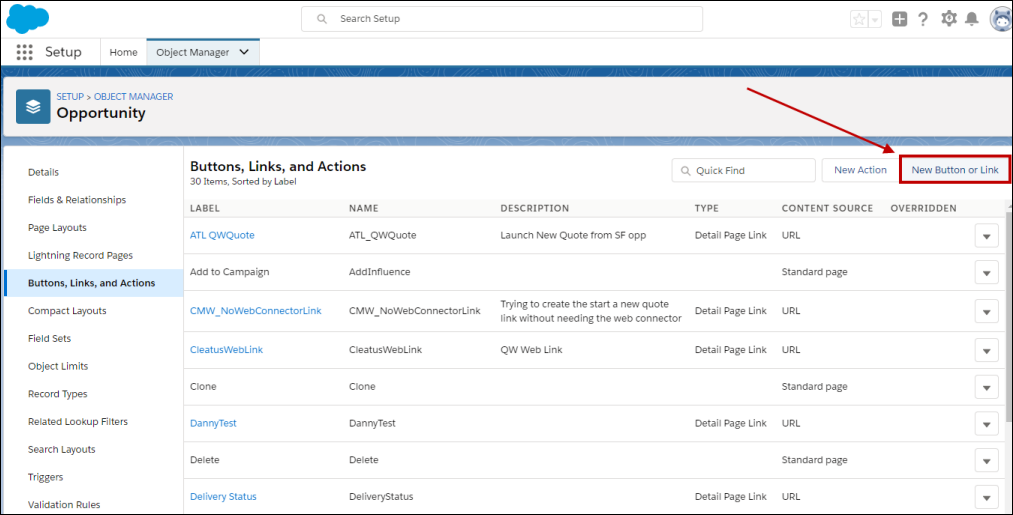
Step 5: Click on the "New Button or Link" button to create the link:
Step 6: First you will need to enter in a “Label” and “Name”. The Name cannot have a space. In our example we have titled ours “New Quote.” We recommend leaving the “Link encoding” as the default value
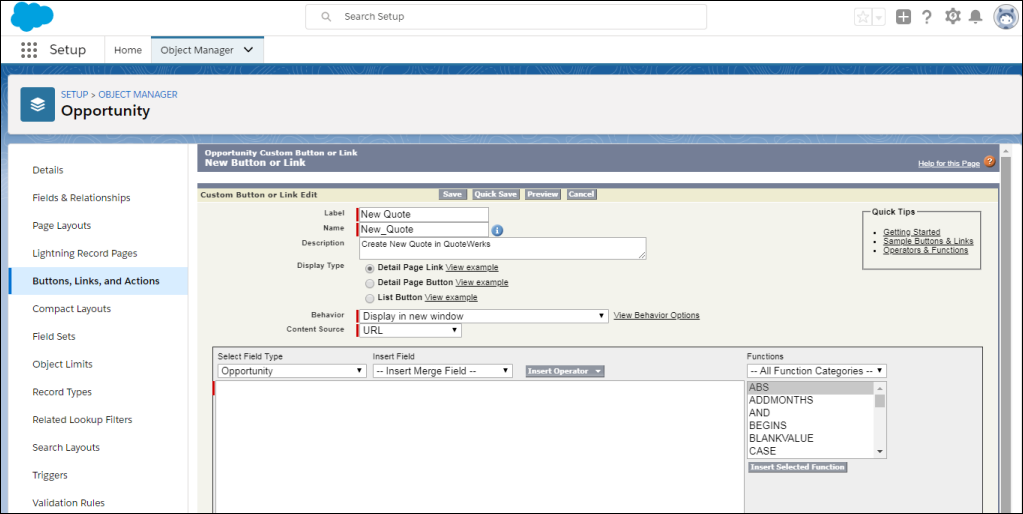
Step 7: Set the Behavior as “Display in new window". Set the “Content Source” to “URL”. Next, copy and paste this text:
https://www.qwcontent.com/QuoteWerksURLProtocolRedirector.aspx?RedirectorAction=newquote&source=salesforce.com&context=opportunity&SoldToCMOpportunityRecID={!Opportunity.Id}&DocName={!Opportunity.Name}&SoldToCMCompanyRecID={!Account.Id}&SoldToCompany={!Account.Name}&SoldToAddress={!Account.BillingStreet}&SoldToCity={!Account.BillingCity}&SoldToState={!Account.BillingState}&SoldToPostalCode={!Account.BillingPostalCode}&SoldToCountry={!Account.BillingCountry}&ShipToCompany={!Account.Name}&ShipToAddress={!Account.ShippingStreet}&ShipToCity={!Account.ShippingCity}&ShipToState={!Account.ShippingState}&ShipToPostalCode={!Account.ShippingPostalCode}&ShipToCountry={!Account.ShippingCountry}&SoldToPhone={!Account.Phone}&SoldToFax={!Account.Fax}&SoldToCMContactRecID={!Contact.Id}&SoldToContact={!Contact.Name}&SoldToEmail={!Contact.Email}
https://www.qwcontent.com/QuoteWerksURLProtocolRedirector.aspx?RedirectorAction=newfromtemplate&templatename=INSERTTEMPLATENAMEHERE&source=salesforce.com&context=opportunity&SoldToCMOpportunityRecID={!Opportunity.Id}&DocName={!Opportunity.Name}&SoldToCMCompanyRecID={!Account.Id}&SoldToCompany={!Account.Name}&SoldToAddress={!Account.BillingStreet}&SoldToCity={!Account.BillingCity}&SoldToState={!Account.BillingState}&SoldToPostalCode={!Account.BillingPostalCode}&SoldToCountry={!Account.BillingCountry}&ShipToCompany={!Account.Name}&ShipToAddress={!Account.ShippingStreet}&ShipToCity={!Account.ShippingCity}&ShipToState={!Account.ShippingState}&ShipToPostalCode={!Account.ShippingPostalCode}&ShipToCountry={!Account.ShippingCountry}&SoldToPhone={!Account.Phone}&SoldToFax={!Account.Fax}&SoldToCMContactRecID={!Contact.Id}&SoldToContact={!Contact.Name}&SoldToEmail={!Contact.Email} |
|---|
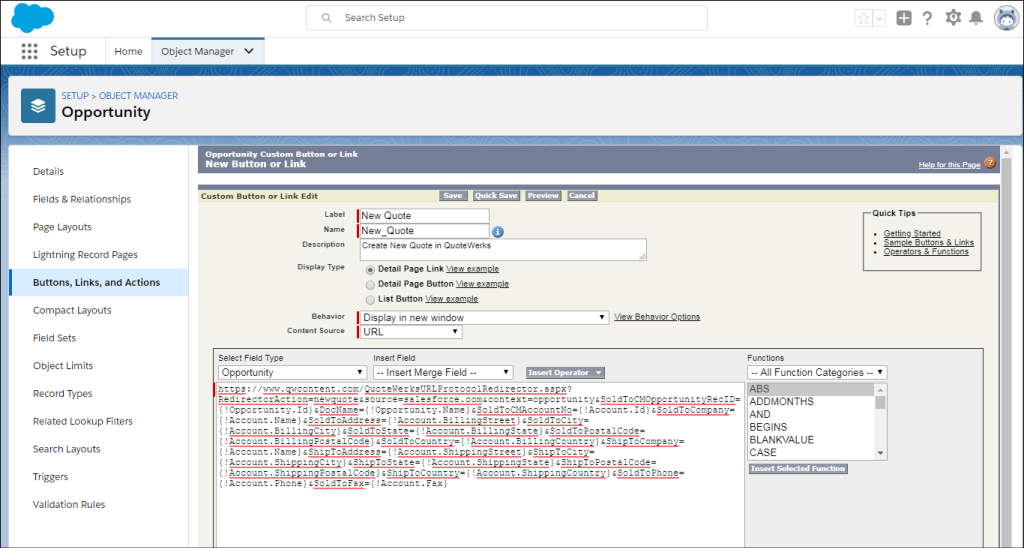
Click Save.
Salesforce.com Special Setup Notes
The salesforce.com integration has a unique feature that enables the salesforce.com user to click on a hyperlink located on a salesforce.com window such as an opportunities window which will start QuoteWerks and copy all the account and opportunity information into a new quote to automate the creation of a new quote using the details from the salesforce.com window. The special “Link URL” that you need to use when setting up this hyperlink is below.
Link URL (for Opportunities tab):
https://www.qwcontent.com/QuoteWerksURLProtocolRedirector.aspx?RedirectorAction=newquote&source=salesforce.com&context=opportunity&SoldToCMOpportunityRecID={!Opportunity.Id}&DocName={!Opportunity.Name}&SoldToCMCompanyRecID={!Account.Id}&SoldToCompany={!Account.Name}&SoldToCMContactRecID={!Contact.Id}&SoldToContact={!Contact.Name}&SoldToEmail={!Contact.Email}&SoldToAddress={!Account.BillingStreet}&SoldToCity={!Account.BillingCity}&SoldToState={!Account.BillingState}&SoldToPostalCode={!Account.BillingPostalCode}&SoldToCountry={!Account.BillingCountry}&ShipToCMCompanyRecID={!Account.Id}&ShipToCompany={!Account.Name}&ShipToAddress={!Account.ShippingStreet}&ShipToCity={!Account.ShippingCity}&ShipToState={!Account.ShippingState}&ShipToPostalCode={!Account.ShippingPostalCode}&ShipToCountry={!Account.ShippingCountry}&SoldToPhone={!Account.Phone}&SoldToFax={!Account.Fax}
Note: You can see that the word “newquote” is bolded in the url string. If you would like to create a new order rather than a new quote, then change that word to “neworder”. The same can be done for “newinvoice”. |
Link URL (for Contacts tab):
https://www.qwcontent.com/QuoteWerksURLProtocolRedirector.aspx?RedirectorAction=neworder&source=salesforce.com&context=contact&DocName={!Account_Name} &SoldToCMCompanyRecID={!Account_ID}&SoldToCMContactRecID={!Contact.Id}&SoldToContact={!Contact_FullName}&SoldToTitle={!Contact_Title}&SoldToPhone={!Contact_Phone}&SoldToFax={!Contact_Fax}&SoldToEmail={!Contact_Email}&SoldToCompany={!Account_Name}&SoldToAddress={!Contact_MailingStreet}&SoldToCity={!Contact_MailingCity}&SoldToState={!Contact_MailingState}&SoldToPostalCode={!Contact_MailingPostalCode}&SoldToCountry={!Contact_MailingCountry}&ShipToCMCompanyRecID={!Account.Id}&ShipToCompany={!Account_Name}&ShipToContact={!Contact_FullName}&ShipToTitle={!Contact_Title}&ShipToAddress={!Contact_MailingStreet}&ShipToCity={!Contact_MailingCity}&ShipToState={!Contact_MailingState}&ShipToPostalCode={!Contact_MailingPostalCode}&ShipToCountry={!Contact_MailingCountry}
Link URL (for Accounts tab):
https://www.qwcontent.com/QuoteWerksURLProtocolRedirector.aspx?RedirectorAction=newinvoice&source=salesforce.com&context=account&DocName={!Account.Name}&SoldToCMCompanyRecID={!Account.Id}&SoldToCompany={!Account.Name}&SoldToAddress={!Account.BillingStreet}&SoldToCity={!Account.BillingCity}&SoldToState={!Account.BillingState}&SoldToPostalCode={!Account.BillingPostalCode}&SoldToCountry={!Account.BillingCountry}&ShipToCMCompanyRecID={!Account.Id}&ShipToCompany={!Account.Name}&ShipToAddress={!Account.ShippingStreet}&ShipToCity={!Account.ShippingCity}&ShipToState={!Account.ShippingState}&ShipToPostalCode={!Account.ShippingPostalCode}&ShipToCountry={!Account.ShippingCountry}&SoldToPhone={!Account.Phone}&SoldToFax={!Account.Fax}
The hyperlink is listed here in the help file so that you can easily copy the hyperlink text from this help file in order to paste it into the salesforce.com setup window.
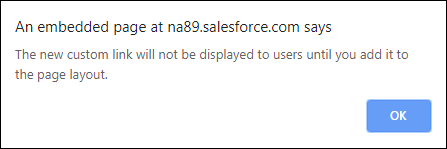
Step 8: Before you can use the web integration link you will need to add it to the Opportunities Tab Page Layout. Salesforce.com will remind you of you this by prompting you with the window below:
Step 9: Click on the “Page Layouts” link under the Setup-> Object Manager-> Opportunity Menu:
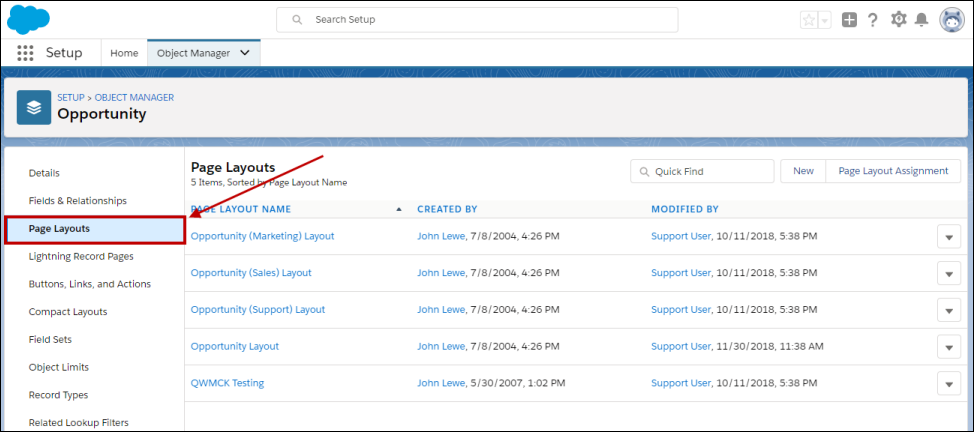
Then select the “Edit” action.
Step 10: To add the “New Quote” web integration link to the page layout, edit the Opportunity Layout (sales). To add this web integration link to the page layout, drag it into the Custom Links section:
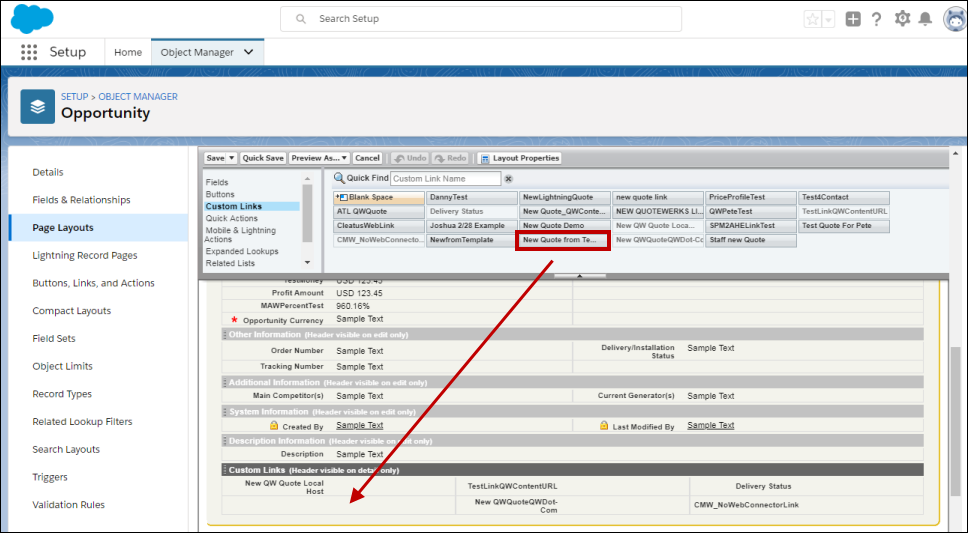
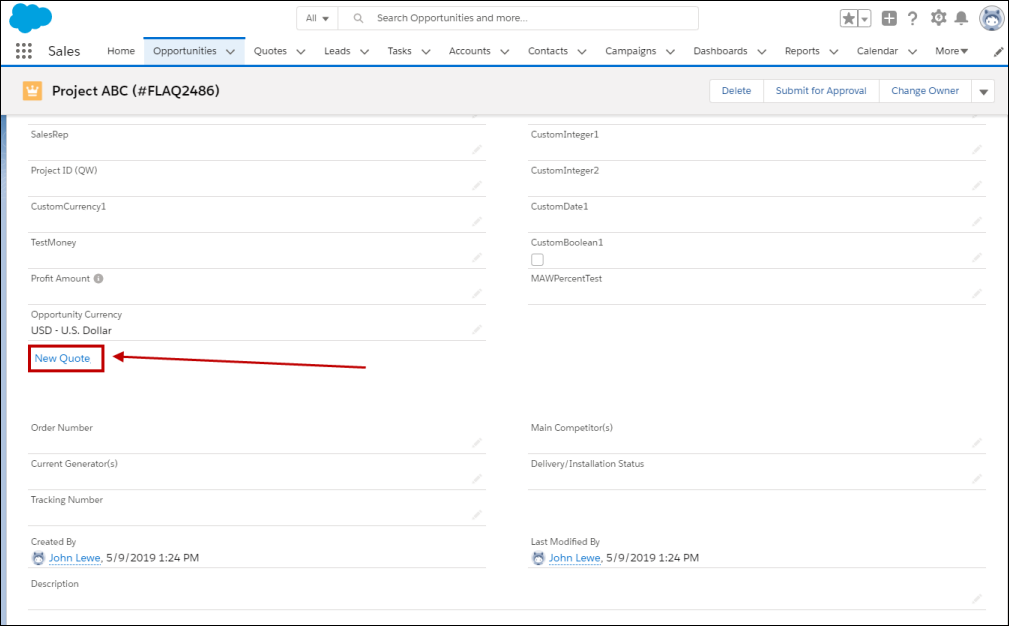
To save your changes, click on the [Save] button. To use the web integration link you will need to open/view an opportunity. Under the “Custom Links” heading you will see the “New Quote” link:
|
Creating a New Quote from an Existing Salesforce.com Opportunity
If you have an existing opportunity that was created within salesforce.com, you can initiate a new quote for this opportunity by clicking on the “New Quote” hyperlink found under the “Web Integration Link” or “Useful Links”section located on the opportunity screen. See prior section for details on setting up this “New Quote” hyperlink.
From the selected Opportunity click on the “New Quote” link:

This link will launch QuoteWerks and you will be prompted with a QuoteWerks login window:
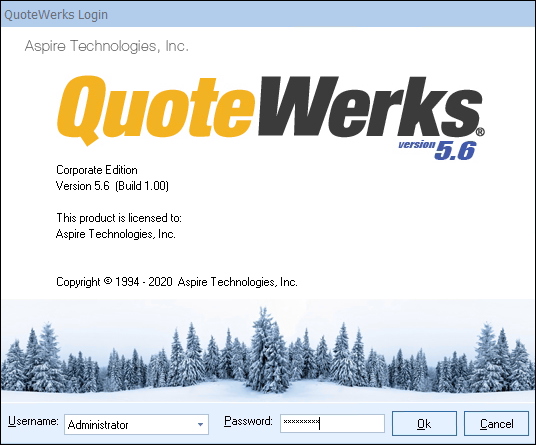
Select your user name if it has not already been selected and provide your password.
Once you log into QuoteWerks, information from the sales opportunity will be passed to QuoteWerks. This includes the account number, opportunity id, opportunity name, contact and address information.
At this point, you can use QuoteWerks to create the quote, and when you save the quote, the existing opportunity will be updated with the details from the quote.