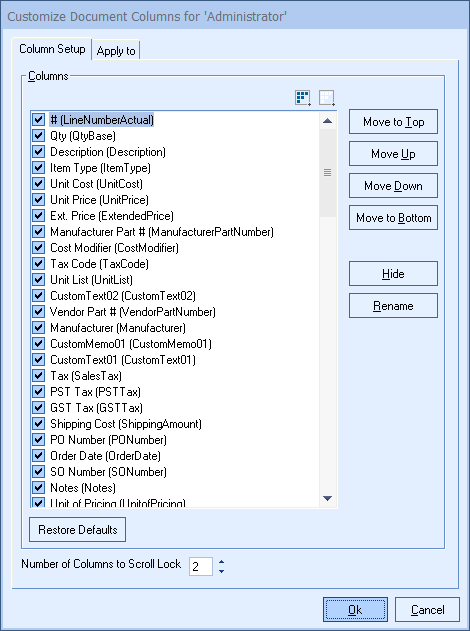
The items that have been added to your quote are displayed on the Document Items tab of the Quote Workbook. The Document Items tab has many columns displayed on it, which can be customized. You can customize which columns are displayed for each user, the title of each column and in which order the columns appear in by selecting the View -> Customize Columns menu. The original field name will be shown in parentheses and any changes you make to the field name will be displayed first:

If the Misc Access right of “CannotModifyDocumentItemsColumns” is set for the currently logged in user, the user will not be allowed to customize their columns. For details on security settings, see User Maintenance and Security.
Change Column Order
To change the order in which the columns appear, you can either click and drag the item to the preferred location or select the item and click the [Move Up] and [Move Down] buttons to shift the item 1 position at a time. You can also use the [Move to Top] button to move a column to the top of the Customize Columns window and the [Move to Bottom] button to move a column to the bottom of the window.
Hide and Show Columns
The items that are checked will be the columns displayed on the Document Items tab of the quote workbook. To hide a column, select that column and click on the [Hide] button. To show a column that is currently hidden, select that item and click on the [Show] button. Note that the [Hide] button becomes a [Show] button when the item selected is currently hidden.
Scroll Lock
The Scroll Lock feature allows you to specify how many columns on the Document Items Tab you wish to lock when scrolling to other columns.
Customizing Column Names
Most likely, you will not need to modify the standard columns like Qty, Manufacturer Part #, etc., but for example, instead of the column title of Unit Price, you may want to name it Rate.
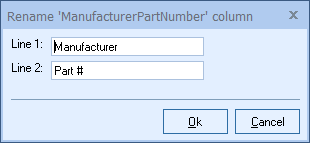
To change a column name select the column name you would like to change and click on the [Rename] button. The Rename window will appear:

Type in the column title name you would like to appear as the header of that column in the Document Items tab.
Applying Customized Columns to Users
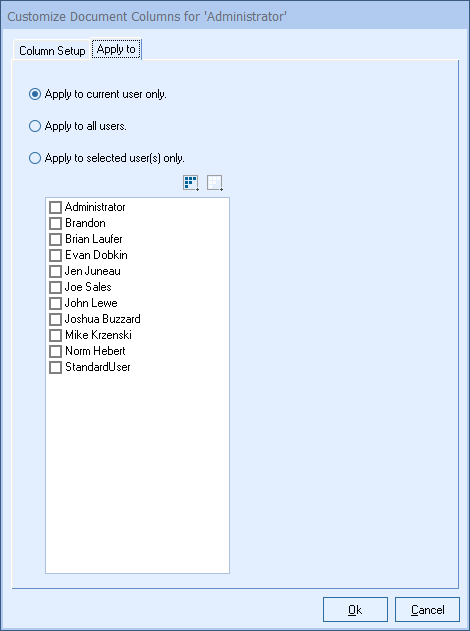
If you have Master Rights, then an Apply to tab will be visible that will give you the option to apply these column changes to all users, or a list of selected users.

Setting Up and Using Custom Columns
QuoteWerks also has many custom columns that can be used to store custom information about each line item in the quote. Using the View -> Customize Columns menu you can also customize these custom columns in the same way that you can customize the other columns on the Document Items tab.
Once you have customized these columns, you can use them in several ways. For example, you can manually type in information into these custom columns. Also, you can set up QuoteWerks so that when you add a product to the quote, QuoteWerks can copy information from custom fields in the product definition into the custom columns in the quote. There are 14 CustomText fields, 5 CustomMemo fields, and 5 CustomNumber Fields, and 2 CustomDate fields available.
To setup QuoteWerks to copy the information from the product definition’s custom fields into the Quote Workbook custom columns, select the Tools -> Options -> Field Links tab and check the checkbox next to the appropriate “Link Custom{Field}XX column to Custom{Field}XX Product field” checkboxes on the Links tab.
|